DIY Paper Chandelier


15 DIY Simple and Genius Ideas that can Inspire You

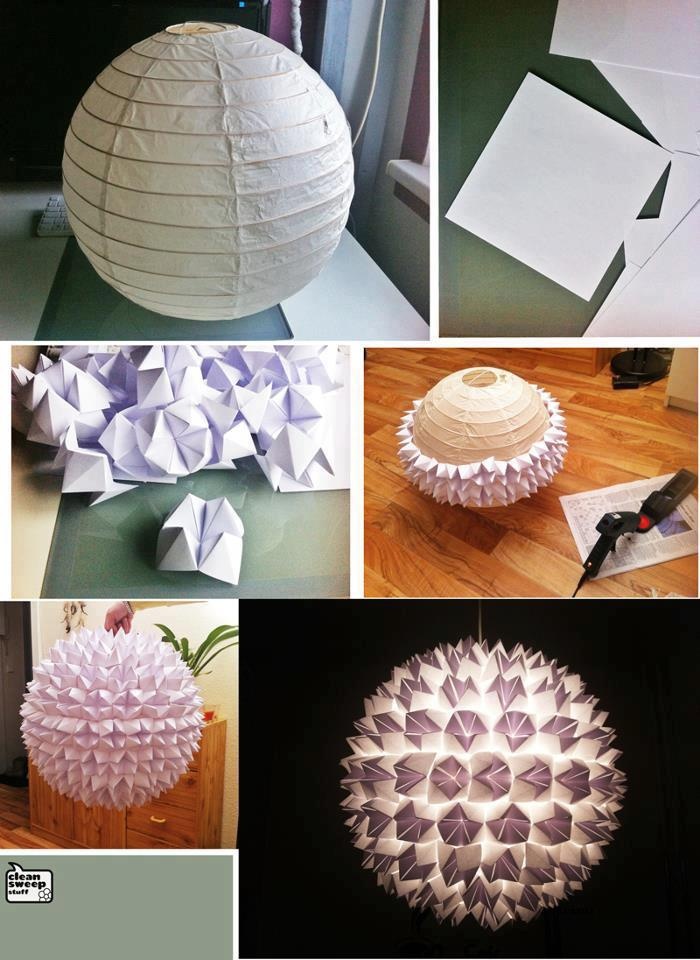
You can buy a $5 chandelier like this one for a dollar store and transform it to unique paper chandelier

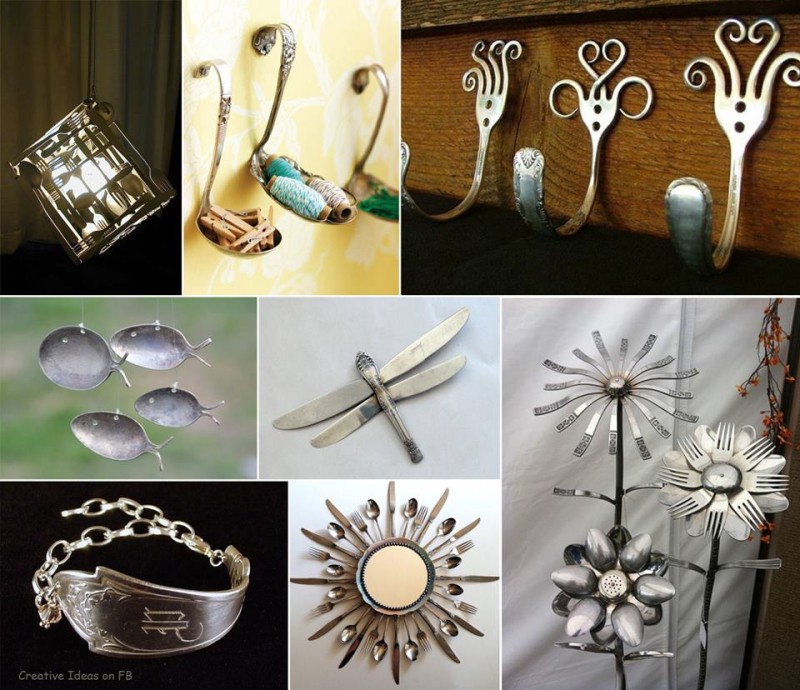
How to use Old forks and spoons

25 DIY Ideas to Recycle Your Potential Garbage

We all have at home (or our parents) piling incomplete forks and spoons. Let’s see how to use them.

Decorating with bottles

25 DIY Ideas to Recycle Your Potential Garbage

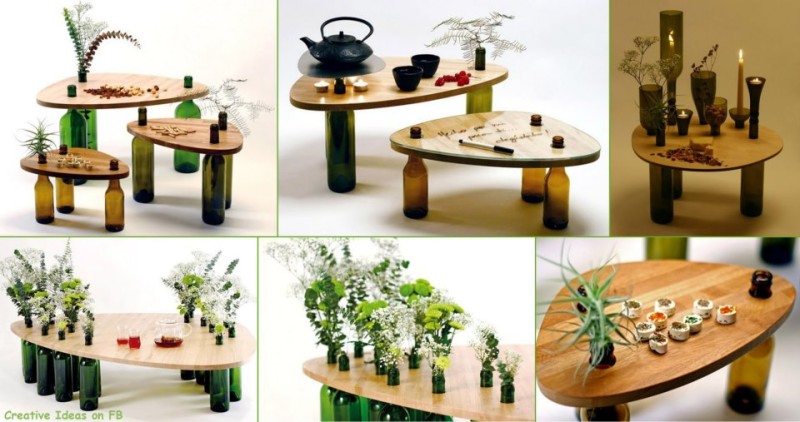
Build your own amazing table for your home using wine bottles.Those green glass bottles are impressive legs for your wooden table.Do it Yourself.

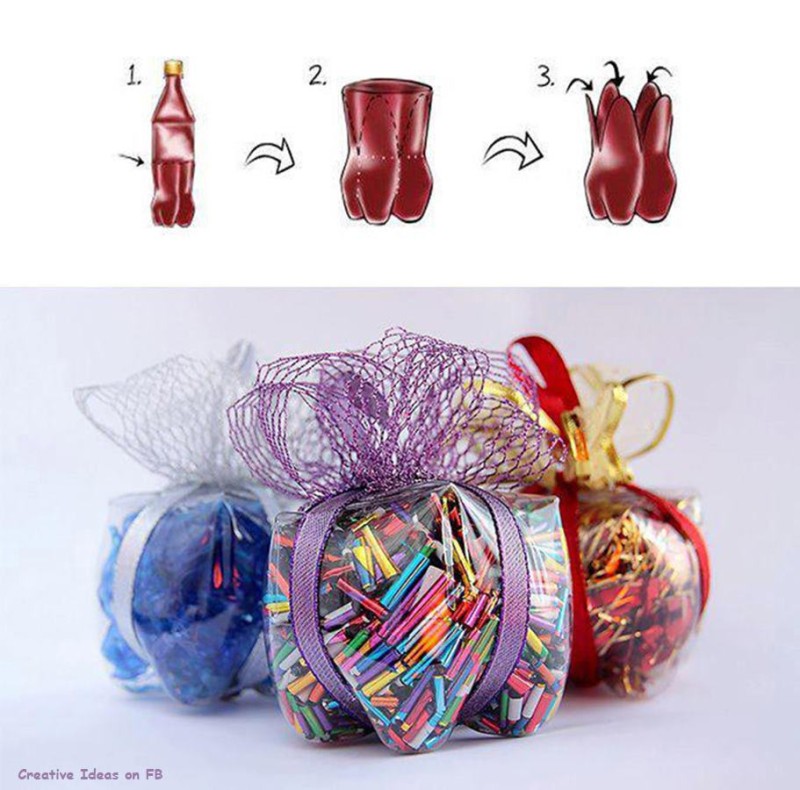
Use a simple coke plastic bottle to make an original box for gifts

25 DIY Ideas to Recycle Your Potential Garbage

Use a simple coke plastic bottle to make an original box for gifts

DIY amazing ways to Recycling

25 DIY Ideas to Recycle Your Potential Garbage

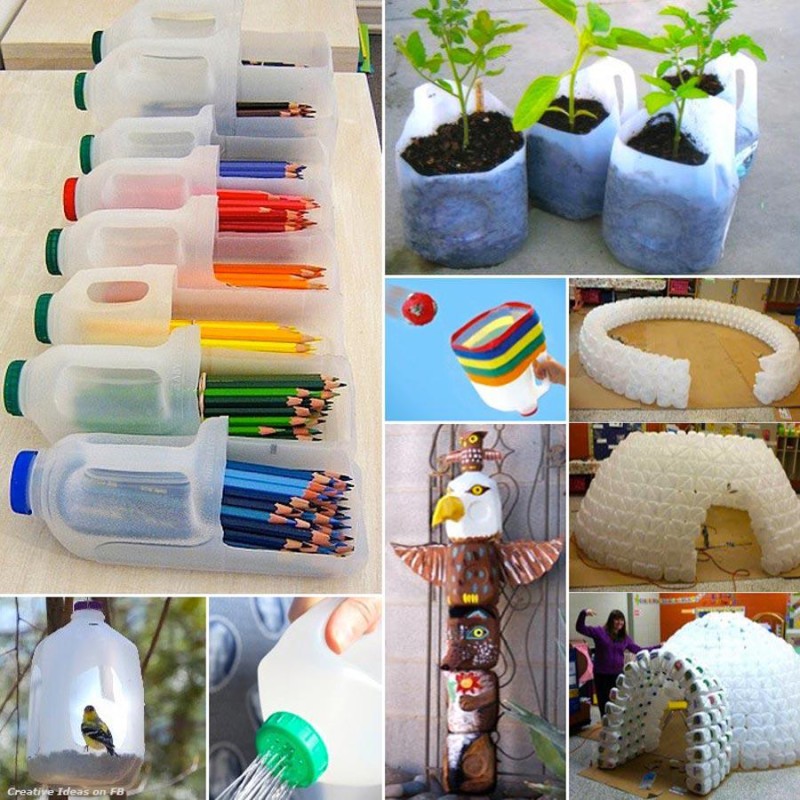
I decide to share some amazing ideas how to recycle your garbage.Take a look at those 5 different ways and don't forget to help our planet.

Amazing kitchen home decor


Brick by Brick
Chicago brick with extra mortar gives these kitchen walls a charming patina. The white mortar connects the backsplash to the room's white cabinets and open shelves. Gray concrete countertops contrast with the white in the room, but the contrast isn't so great that it creates dissonance.

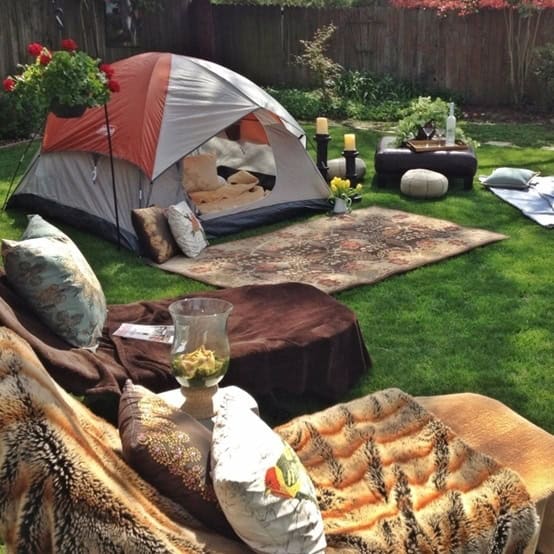
Go camping in your own backyard- create your own camping exterior design

30 DIY Ways To Make Your Backyard Awesome This Summer

Don't you think that is a great idea to build your own camping on your backyard.It will be an amazing night for the kids.Take an example of how your camping should looks like.

Build your own giant hammock swing -special exterior decor ideas

060811-hammock1.jpg
The Giant Sweet Swing of Goodness: So straight up, there's no denying it, that swing is dope. Although it's curvy lines might appear intimidating for homeowners to make themselves, wood can be manipulated slowly when kept wet. Likewise, a flat platform, although not so cradle-like, would be an excellent stand-in and is easily conceived.

Special fire pit with amazing decor design

30 DIY Ways To Make Your Backyard Awesome This Summer

Here’s a very cool personal fire pit you can can set up for your special guests or just drink a glass of wine with your lovely person.Absolutely romantic atmosphere for a long relaxing night outside.Take this example and make your moments fith your family unforgetable.

Turning an old bunk bed into a stargazing treehouse-Amazing idea for DIY interior decor design


Turning an old bunk bed into a stargazing treehouse-Amazing idea for DIY interior decor design

TERRARIUM ORNAMENTS


What you’ll need:

- clear glass ornaments
- dried moss
- twine
- pencil
- q-tips
optional- twigs, butterflies, feathers etc…
1. Tear off a small piece of moss and moisten slightly (this helps to keep the moss from crumbling a lot of dust inside).
2. With the eraser end of your pencil, gently push moss into the opening. Repeat this a few times until you have a forest floor on the bottom of your ornament.
3. Add any extras and poke with your pencil to style things as necessary.
4. Bend a q-tip and clean any debris stuck to the inside walls of the ornament.
5. Attach a piece of twine with a bow and hang.


DIY PROJECT: PAPER BAG LANTERNS


What you need:


1. white paper bags (3.5” x 6.5” we found these , paper bags online on amazon)


2. bone folder


3. pencil


3. stencils and/or stamps and white stamp pad


4. x-acto knife


5. small piece of cardboard


6. 22 gauge wire, cut in to 17” segments


7. grommets and grommet pliers


8. tea lights


9. long matches or long lighter

what you do:


1. fold over about 1” of the top of the bag. this was a little tricky but after ripping a few, we got the hang of it. start slowly, moving in a circular motion and going little by little. when you have the entire 1” folded over, pull out the gussets on both sides and use the bold folder to make the top that you folded over a clean fold.


2. slide the small piece of cardboard in the flat bag, so you have a surface to cut on without cutting through the other side of the bag.


3. using a pencil, trace your stencils and use an x-acto knife to slowly cut out the design. (or, we used our rubber stamp collection to stamp on the bags in white, let dry and cut around the stamp. this way if you are not exact in your cutting, the white ink blends with the bag, leaving room for a few mistakes!)


4. on the middle side of each bag put a grommet about 1/2” down from the top.


5. use the cut wire to form a “handle” by looping it through each grommet and twisting it up to secure on both sides.


6. put a tea light in each bag and hang on a porch, deck or even inside a dining room. light each tea light using a very long match or lighter.


bbbcraft makes it a gift! we also put 6 flattened bags, twisted wire and 6 tea lights in a decorated (slightly larger) white paper bag (along with two long matches) and took them to an outdoor party in los angeles. the hostess took them out and lit them right away for us all to enjoy!

DIY PROJECT:COFFEE CAN LANTERNS


Materials:
- Coffee Cans
- Ball-peen hammer
- 2 x 4 (one foot length)
- 1 x 4 (two foot length)
- Clamps
- Nails, screwdrivers (variety)
- Votives

Process:

1. Prepare your workspace by attaching the 1×4 to the 2×4 as shown using wood screws or nails. Make sure the 1×4 extends the 2×4 on one end by the depth of your can and is attached with the 1inch edge upwards. This thin work area helps to prevent denting to your lantern when punching the design. Use the clamps to secure the 2×4 to a sturdy table.

2. Print out the design of your choice and tape it around your can.

3. Place the end of the 1×4 inside your can. Using a small nail, punch the corner dots in the design you choose. Turn the can as you go to make sure that the area you are punching is supported by the wood.

4. Remove the paper. Using your other tools finish punching the rest of the design following your guide holes. Experiment with a variety of nails and screwdrivers to create different shape and size punches.

5. For hanging, use the wire to create a simple hook by threading a length of wire through two holes on opposite sides of the can and secure.

6. To finish add 2-3 votives, light and enjoy!

DIY PROJECT:PAPER CAPIZ SHELL CHANDELIER


Materials:
- hanging planter basket
- white spray paint
- ribbon
- scissors
- 1-2 rolls wax paper
- 2 big pieces of parchment paper
- iron
- hot glue gun & glue sticks
- circle cutter (i didn’t have any luck with a “punch”)
- cutting mat
Instructions:
1. spray paint your planter basket. let dry.
2. start making the capiz shells. lay out the two pieces of parchment paper on your ironing board or on a clean dish towel on the floor or table. (if you use your floor or table, just make sure it wont be damaged by the heat of the iron)
3. cut three pieces of wax paper about the same length. mine were about 18”. sandwich the three pieces of wax paper between the parchment paper. the parchment paper allows the wax to stay within the layers of paper, helps it stick together, and gives the wax paper a smooth finished surface.
4. iron the paper sandwich on a low setting. remove the layered wax paper from between the parchment, and repeat.
5. set the circle cutter to cut 2 ½ inch circles. with the circle cutter, cut circles from the layered wax paper on your cutting mat. it helps to tape the wax paper down tothe mat.
6. cut ribbon pieces and attach the ribbon to the planter basket. the length of the ribbon will depend on the method of attachment to the basket… (single or double strand). my lengths were between 7 (single) and 16 inches (doubled). you can attach them to the basket either by hot gluing the end of a single strand to the basket wire, or by folding the ribbon in half, and creating a knot over the wire. start at the bottom, and work your way up.
7. once you finish one tier of ribbon, attach the capiz shells to the ribbon with a tiny dot of hot glue near the top of each shell. i alternated two and three shells on each ribbon and only attached shells to every other ribbon. overlap the shells by about ¼”. finish an entire lower tier, then move on to the next higher tier.
8. once you cover the hanging basket you are done! you can attach a simple bulb of you want this to be a source of light. hang in your desired location, stand back and admire.

DIY PROJECT:GLASS-JAR MOROCCAN LANTERNS


Materials
old glass jars (spaghetti jars, jam jars or any plain glass jar will work)
gold dimensional puff paint
glass paint (Delta or Pebeo Vitrea glass paint are great options)
paintbrush
wire (optional, for hanging lanterns)
Instructions
1. Remove labels and any glue residue from the glass jars and allow them to dry completely.
2. Apply the gold dimensional paint in various patterns. You can use the applicator tip to create small stud-like dots, draw various decorative patterns or push around the paint to create solid areas of gold. Let dry.
3. Pour a small amount of glass paint inside the jar and use your paintbrush to drag the paint up the sides of the jar, coating all of the jar’s interior. Let dry.
4. Your lanterns are now ready to enjoy indoors or out! Simply fill them with candles or add loops of fine-gauge wire to the tops for easy hanging.

DIY PROJECT: AUTUMN LEAF BOUQUET


Materials
10 colorful maple leaves per flower in various sizes (they should be dry & freshly fallen, so they are pliable)
short twigs
scissors
floral tape
Instructions
1. Using one of the smaller leaves, place the colorful side down and fold the points in. Begin to roll the leaf from one side.
2. Take a second leaf and fold the center point down. Place the first rolled leaf in the center, fold down the side points on the second leaf and wrap both sides around the first “bud.”
3. Continue to add leaves, rotating the flower as you go to get an even size. Work with the smaller leaves at the center and the larger ones toward the outside. When you rotate, it also helps to keep the petals tucked in so that it doesn’t unravel.
4. When you have added all your leaves or reached the desired size, pinch the leaf stems tightly and begin to wrap with florist tape. Trim the stem ends by cutting with scissors.
5. Finally, if you are wanting a “long stem,” use a stick and attach to the flower by wrapping it with a bit more florist tape.
6. You’re done!

RECYCLED PAPER BASKET DIY


Materials
long lengths of paper (I used packing paper, but wallpaper scraps or gift wrap would work great, too.)
sewing machine
glue or hot glue
paperclips
Instructions
1. Fold and sew the strips.
Starting with a large piece of paper (mine was 30″ wide), begin folding the strips. Simply fold up the edge about 1″, then continue folding it over and over onto itself, creasing the paper well with each fold. The number of folds you make will depend on how heavy your paper is; I folded mine so that there were about 10 layers total. The goal is to make strips that feel sturdy but not so stiff that they won’t be able to bend around the curves of the basket.
Next, sew along one edge of the strip, about 1/8″ or so from the folded edge.
Then repeat along the other edge of the strip. Repeat this process to make as many strips as you plan to use for the base of your basket. I used eight total.
2. Weave the strips.
Weave the strips together so they create a large cross shape. If there is a wrong side to your strips (i.e., a side where you see the raw edge of the paper or any other flaws), situate these so they are facing up, which means they’ll be hidden on the inside of the basket when it’s finished.
It helps to secure the overlapping strips around the perimeter so that things won’t slip around too much while you’re working.
Next, measure the width of one side of the cross. Add about 2″ to that measurement then multiply by 4. This is the length your strips will need to be to create the sides of the basket. Make several strips to this length, using the same method as above.
Then begin weaving the long strips to create the sides. The first round is the most awkward — I find it helps to temporarily hold the strips in place with paperclips as you go.To finish off the ends of the first round, just overlap the two ends and tuck them in (you will probably have to trim them so that the ends will hide behind another strip rather than poke out). At this point, you can either paperclip the ends or secure them with a dab of hot glue.
Then simply continue creating rounds in the same way, moving the paperclips up on each round as you work. I did four rounds total, but you can make your basket as shallow or as tall as you like.
3. Finishing
To finish off the top edge of the basket, fold all the strips to the inside . . .
. . . and then trim the raw edges and tuck them into strips from the rounds below. Secure all the folded strips in place with a bit of glue so none of them sneak out of place.
And that’s it! Use this basket to corral household clutter or craft supplies, and if you get tired of it, well, just recycle it. Happy organizing!


DIY PROJECT: SCULPTURAL PAPER ORB LIGHTS


Materials
100–125 white standard-sized paper cupcake liners
100–125 vertically striped petit fours papers
(1) 18–20″ white paper lantern
hot glue gun
1 Hemma Cord from IKEA (for lighting) ($3.99)
Instructions
1. Assemble the lantern and place it top up in a wide, shallow bowl to act as a base.
2. Put a small dot of hot glue on the backside of a white cupcake liner. Starting about 1/2″ in from the wire ring at the top of the lantern, place the cupcake liner on the lantern and press until it is attached.
3. Continue around the ring, spacing the papers so that the circular bases are approximately 1″ apart, allowing the outer edges to merge and shape.
4. Apply the cupcake papers around the lantern in rings until you are 3/4 of the way down, and then flip the lantern over and gently place it back in the bowl, top side down.
5. Complete the underside, and fill in the bottom so that the papers cover the base opening.
6. Begin applying the petit fours papers, centering them inside each white paper. Three-quarters of the way up the lantern, flip it top side up. Complete the top side.
7. Go back through, gently manipulating the outer papers to the desired shape. I kept mine fairly organic.
8. Drop a light in, and voila!


DIY PROJECT: MAIL BASKET


Materials
5/8″ wide hardwood dowel
1 x 2 hardwood board
leather straps
heavy waxed thread
tacks
Tools
saw
drill press
pocket screw jig
drill
tack hammer
leather hole punch or awl
heavy waxed thread
leather needle
Instructions
1. Cut your wood pieces first. Grab the 1 x 2 and cut a 12″ piece and two 6″ pieces. Cut a dowel piece to 12 1/2″.
2. Time to drill holes: Measure the centers and 3/4″ from the front end of the 6″ pieces, and drill a 5/8″ wide hole that’s 1/2″ deep to accept the dowel. Drill your pocket holes on the ends of the 12″ back piece.
3. Cut your leather strap piece to 11″ lengths. I used six pieces. On one end, punch four holes — two close to the end, and two about 2″ in. You can wrap a piece around your dowel and judge how close you want to punch your holes. After punching holes, I ran some waxed thread though three or four times, tied it toward the back with a square knot and cut the ends.
4. After sewing up all your straps, assemble them to the dowel piece, spacing them evenly, and then you can tack them to the back board. Lay them nice-side down and nail some tacks to the top edge. Make sure to nail them near the top so you can lift them up to screw the frame to the wall and so your screws will be hidden underneath.
5. Lastly, we’re ready to assemble the frame. Attach one side piece using pocket screws in the pocket holes you drilled earlier. Insert the dowel to the attached side, then screw together the other side piece. You might need to tap the dowel with a mallet and ensure that it’s squared with the back piece. After assembly, you can attach it to the wall simply by drilling through the back — the screws will be hidden if you center them under a couple straps.


DIY PROJECT: FISH SCALE PENDANT LAMP


Materials
110# paper
circle cutter (available at most craft stores)
Rit Dye
paraffin wax
mineral oil
crock pot
extra bowl
white paper lantern
glue gun
Instructions
1. Use your circle cutter and use 110# paper to create around 200 circles. The 200 circles will cover a 14 in. paper lantern.
2. Place the cut circles into a bucket of Rit Dye (I used the purple and purple mixed with teal) and allow them to darken to your taste. I chose to make my circles different shades to enhance the texture of the final piece.
3. Create a double boiler with your crock pot and extra bowl. Put a block of the paraffin wax in the extra bowl to melt. Once the wax is melted, add mineral oil to thin the wax. Make sure your circles are dry and then dip each one into the wax, making sure to leave a portion of the top clean and clear of any wax. Lay the circle on wax paper to dry.
Note: Dipping the circles in the wax makes the paper transparent and allows the light to pass through it more easily.
4. Once the wax has dried, start attaching the circles to a white paper lantern. Use a glue gun and be sure to place the glue on the portion of the circle that does not have wax on it.
5. Work your way around the lantern until it is fully covered. I started at the bottom and overlapped my circles in a fish scale-like pattern so the top layer would be at the top of the lantern.
6. Use the lighting kit that comes with the lantern to create an amazing light fixture!
Note: I tested the lantern using a 60 watt compact florescent lightbulb, and the wax stayed cool and completely intact. I recommend sticking with compact florescent bulbs to keep the heat in check.


Amazing DIY FABRIC BOXES


Materials
a sturdy fabric, such as canvas
thread to match
sewing machine, iron and basic sewing supplies
label holders
nail polish (optional)


1. Paint the label holders.


I couldn’t find label holders in a color I liked, so I decided to customize my own by painting them with neon pink nail polish. It works like a dream! Just as if you’re painting your nails, cover the metal pieces in several coats of polish until you achieve full coverage, then finish with a clear top coat.


2. Cut the fabric.


Begin with any size square or rectangle fabric you like. (Mine was 12″ square.) Draw a line of equal distance from each edge; this will determine the height of your sides. (Mine were 3.75″ from each edge). After drawing your lines, the fabric will be divided into a grid of nine sections.


Cut away the four corner sections to create a cross shape. Repeat to make a second, identical piece.


3. Sew the fabric.


Pin the two pieces together with the right sides of the fabric facing and all of the edges aligned.


Using a 1/4″ seam allowance, sew around the perimeter of the cross shape, leaving an opening along the top edge of one of the cross arms.


(Detail of the opening left on the top of one of the arms.)


4. Trim the corners.


Trim away the excess fabric from the point of each corner as well as from each interior corner. (Removing the excess fabric from the corners will help to achieve neat edges when you turn the piece right-side out.)


5. Turn and press.


Turn the whole thing right-side out, carefully working the fabric through the opening left in the stitching. Use a pointy object to poke out each corner. Smooth all the seams flat, then press the piece with a steam iron. Iron under the raw edges of the fabric at the opening so it blends in with the seamed edges.


6. Add top stitching.


Top stitch all around the perimeter of the piece. (This will finish the edges as well as close the seam opening.)


7. Sew the corners.


Fold the piece so that any two of the arms meet each other.


Sew the two edges of the arms together along the top stitching line you made in the previous step. Be sure to backstitch at the beginning and end of this seam to secure it.


Repeat this step for all four corners, and you have a box!


8. Attach the label holder.


All that’s left is to sew on the label holder with a needle and thread. And start organizing your odds and ends!


PAPER CLAY BARNACLES


Materials
toilet paper (about 1 roll)
1 cup joint compound (in the paint aisle)
6 ounces white glue
3/4 cup flour
small balloons (I used water balloons filled with air)
plastic wrap
hot glue gun


Instructions


1. To make the paper clay, soak the toilet paper in a bowl of water. I unrolled it so that the sheets were separate. Squeeze as much water as you can from the toilet paper.


2. Tear the toilet paper into bits until you have two cups. Put it in a large bowl or the bowl of a stand mixer.


3. Add 1 cup of joint compound and the glue, which is equal to 3/4 cup, but it’s easier to just pour it in if you have a bottle that is say 3 ounces. Keep in mind that it doesn’t have to be accurate; this is not a soufflé. Add the flour.


4. Mix well until you get a smooth consistency. I used my stand mixer. I believe that with a little soap, pretty much anything (that is water soluble) washes off. But if you aren’t as eager to use a container that also mixes up your favorite cookies (my husband would die if he knew I put joint compound in the mixing bowl), then by all means use a disposable container or even a plastic bag and your hands!


5. Blow the water balloons up with air. They should be about 3–4 inches or bigger, depending how large you would like your barnacles to be.


6. Make some pancake shapes with the clay. Pat the clay and use your fingers to shape it into round disks about half the thickness of a real pancake, or 1/4 inch.


7. Put the paper clay pancake on the round end of the balloon. Use the palm of your hand to make it stick until it is a little more than halfway up the balloon.


8. Take a square of plastic wrap and place the paper clay-covered balloon in the center of the square. The clay should be against the plastic wrap, the tied end of the balloon pointing straight up.


9. Gather the plastic wrap around the balloon as neatly as you can, bringing the excess up around the tied end of the balloon.


10. Twist the plastic wrap. Twist it more. The balloon will take on a round shape rather than a teardrop.


11. Give it a little squeeze to smooth things out and carefully unwrap it.


12. Place the paper clay-covered balloon on a tray or cookie sheet lined with plastic wrap or parchment paper. Place it in a warm, sunny, breezy place. Once they are completely dry (be patient!), pop the balloon.


13. You can leave the barnacles single or you can group them as I did. Use a small drop of hot glue to stick the barnacles together. I created groupings of three, which gave me some play to arrange them how I liked.


You’re done! You can customize these a million ways: Add paint or metallic leafing to the insides, spray paint the whole set, hang or glue them to vessels or walls. I’ve included some variation images below to inspire you. Enjoy!


A coat of metallic spray paint makes the barnacles look like cast silver sculptures.


Adding a thin wash of paint in a trio of oceany blues to the inside of these barnacles really makes the shapes pop! You can customize them with any color combination you choose.